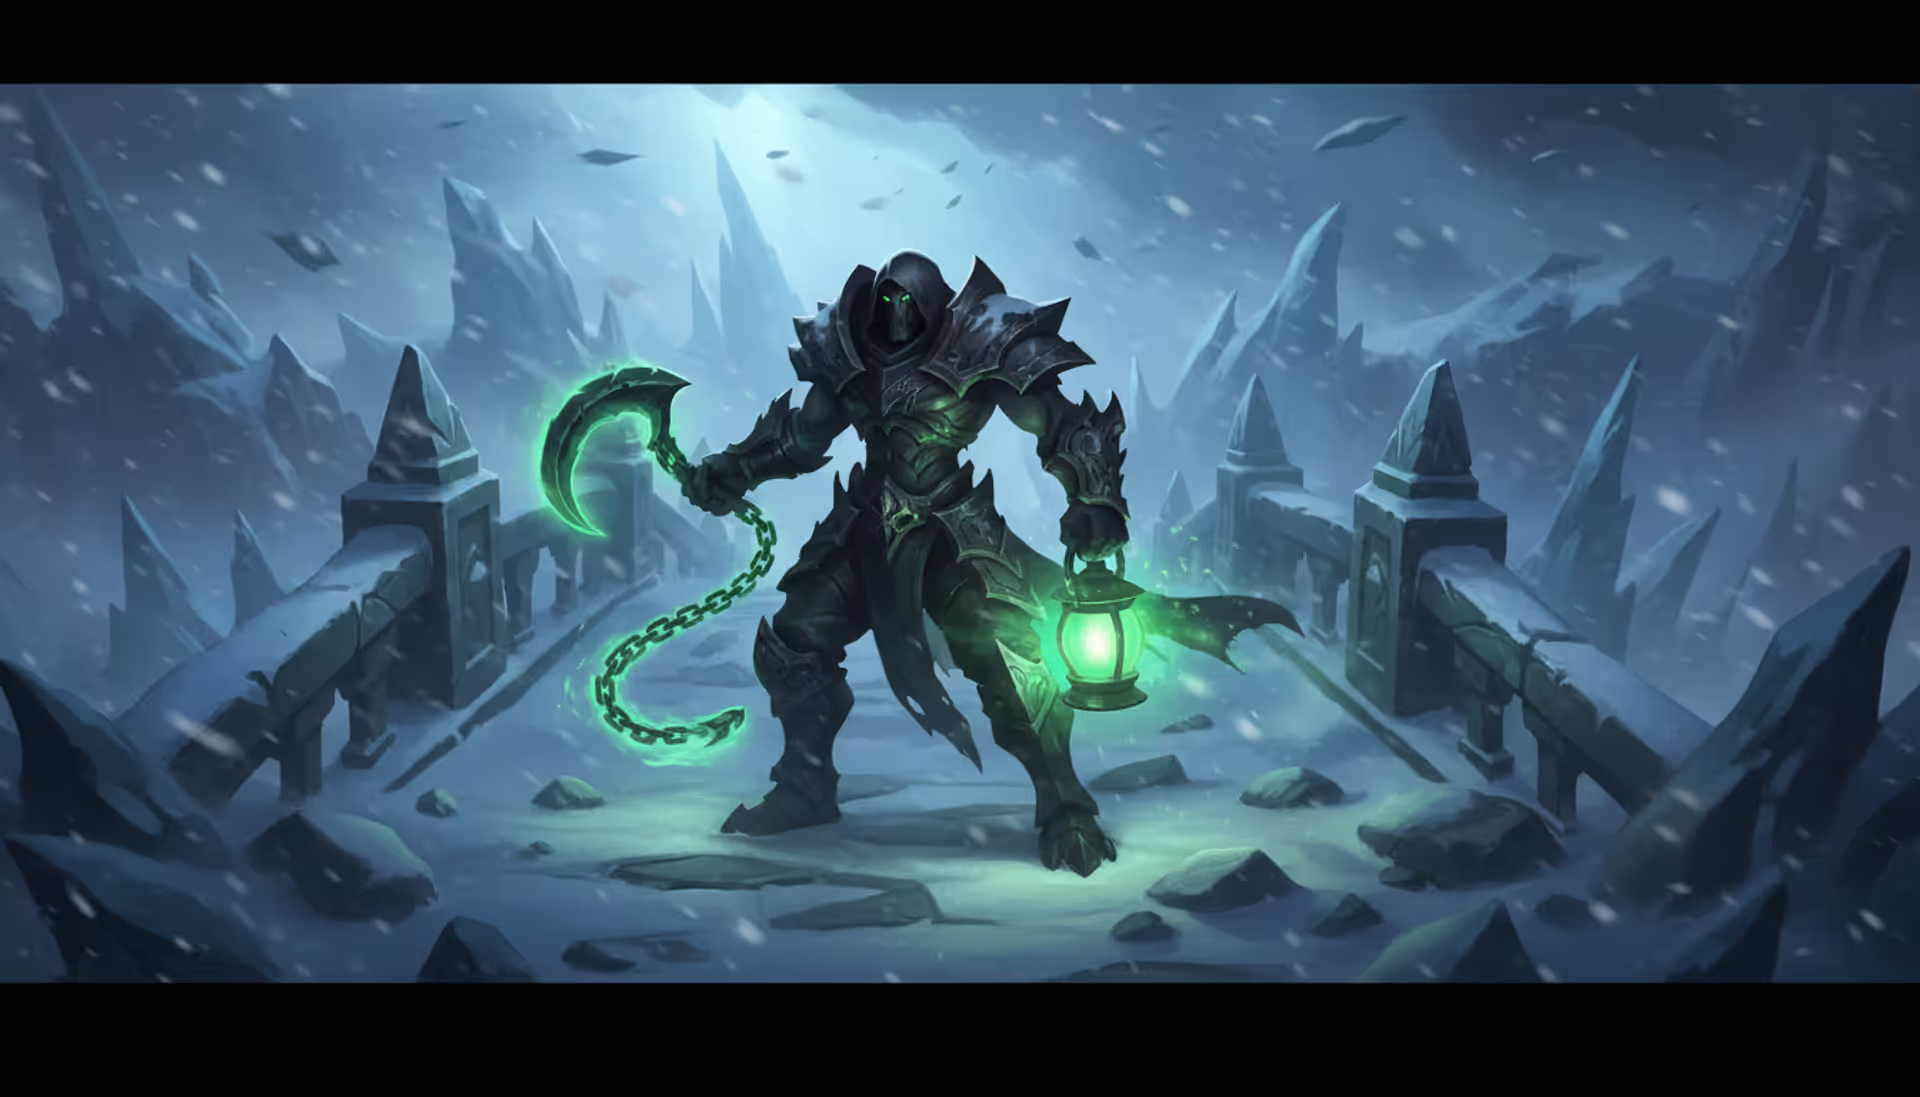
Thresh remains one of the most versatile support champions in ARAM, offering crowd control, playmaking potential, and utility that scales throughout the game. His kit translates exceptionally well to the constant skirmishing and tight corridors of the Howling Abyss, but mastering him requires understanding how his abilities function in non-stop teamfights.
Unlike Summoner's Rift, ARAM eliminates the laning phase and forces immediate 5v5 action. This changes how you approach Thresh's soul collection, hook opportunities, and lantern usage. The single-lane format means every Death Sentence matters more—a successful hook often leads to a kill or objective, while a missed one can leave your team vulnerable during the cooldown.
Best Runes and Summoner Spells for Thresh in ARAM
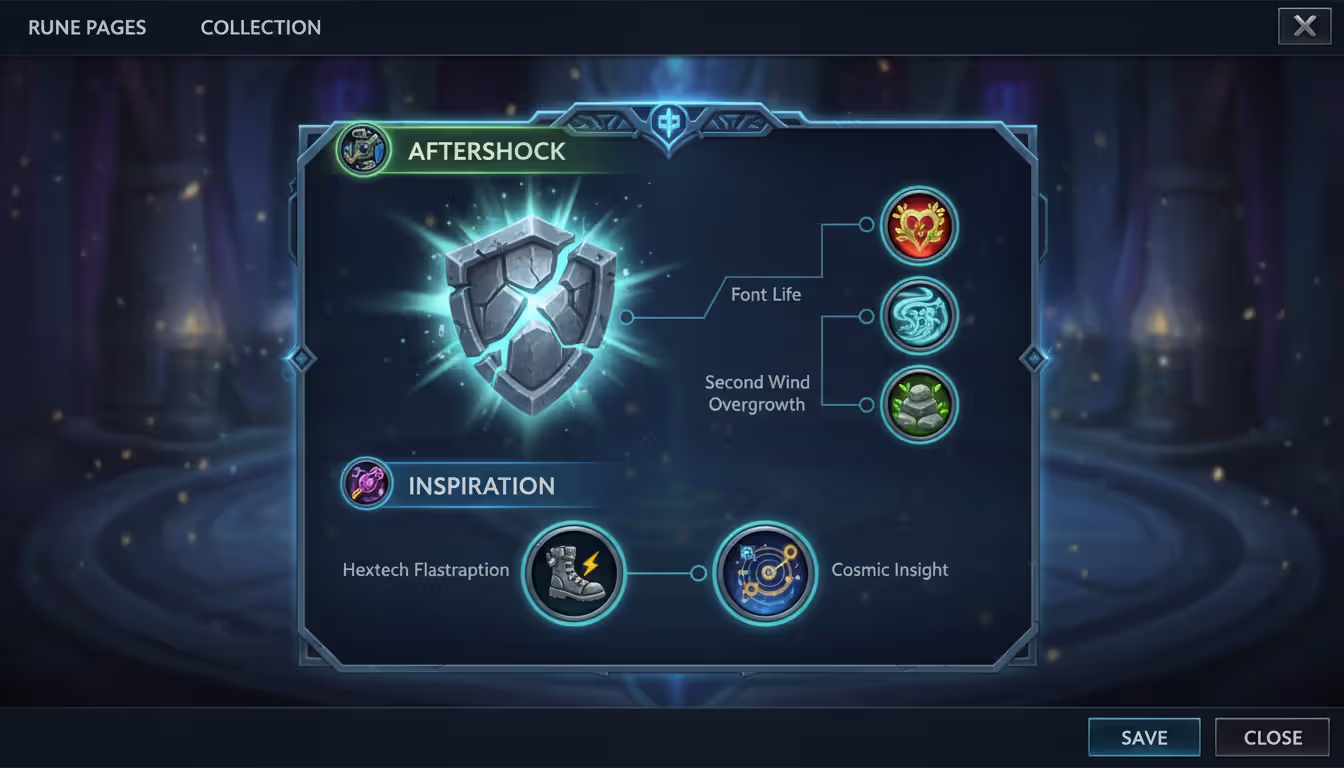
For thresh aram runes, prioritize setups that enhance your engage potential and survivability during extended fights. Aftershock remains the strongest keystone, providing burst resistances when you land hooks or Flay enemies. The shield synergizes perfectly with your naturally tanky build and allows aggressive plays without immediate punishment.
Your primary tree should be Resolve with Aftershock, Font of Life, Second Wind, and Overgrowth. Font of Life marks enemies you crowd control, healing allies who attack them—valuable in sustained ARAM brawls. Second Wind helps sustain through constant poke, while Overgrowth stacks health throughout the game as minions die around you.
Secondary runes work best from the Inspiration tree. Take Hextech Flashtraption for unexpected hook angles from fog of war, and Cosmic Insight for ability haste and summoner spell cooldown reduction. The extra haste means more hooks, more Flays, and more playmaking windows.
Alternative setups include Glacial Augment if your team lacks crowd control, slowing enemies after you hook them and making follow-up easier. Guardian works when facing heavy poke compositions where you need to protect carries rather than engage.
For summoner spells, Flash remains mandatory—it enables flash-Flay combos and emergency escapes. Your second spell should be Exhaust against assassins and divers, or Snowball (Mark/Dash) for additional engage tools. Snowball pairs exceptionally well with Thresh since you can Mark an enemy, throw your lantern backward, dash in, then have teammates click lantern to follow. Clarity works if no one else takes it and your team has mana-hungry champions.
Author: Megan Crosley;
Source: canelomobile.com
Core Build Path and Item Priorities
The thresh aram build guide differs from Summoner's Rift because gold income accelerates and teamfights start immediately. Skip support items entirely—ARAM provides passive gold generation without requiring quest completion.
Start with Guardian's Horn if facing poke-heavy compositions. The health regeneration and damage reduction against champions helps you survive the early game when hooks are hardest to land. Against melee-heavy teams, start Steel Shoulderguards for the additional health and execute damage on minions, though this matters less in ARAM.
Your first major purchase should address immediate needs. Plated Steelcaps work against auto-attack-heavy teams, while Mercury's Treads help against crowd control chains. Don't delay boots—the movement speed helps dodge skillshots and position for hooks.
For mythic items, Locket of the Iron Solari provides the most consistent value. The active shield protects your entire team during engages, and the resistances make you tankier. Evenshroud works when your team has multiple damage dealers who can capitalize on the debuff after you land hooks. Shurelya's Battlesong offers engage and disengage speed but sacrifices tankiness.
After your mythic, build Zeke's Convergence. The item activates when you cast your ultimate, creating a frost storm that slows enemies and empowers your bound ally. The ability haste, armor, and magic resistance make it gold-efficient. Follow with Thornmail against healing-heavy compositions or Frozen Heart against attack-speed champions.
Situational items include Anathema's Chains when one enemy carry dominates, Randuin's Omen against critical strike champions, and Abyssal Mask if you need magic resistance while your team deals magic damage. Warmog's Armor becomes viable once you have enough bonus health, letting you regenerate between fights.
Early Game vs. Late Game Item Adjustments
Early in ARAM, prioritize survivability and ability haste. You need to survive initial pokes and have hooks available frequently. Kindlegem components and Glacial Shroud provide immediate value.
Late game, shift toward team-oriented utility. Your personal survivability matters less than protecting carries and locking down threats. Items like Knight's Vow and Redemption gain value when teamfights determine outcomes. If games extend beyond 25 minutes, consider selling Guardian's Horn for a sixth full item.
Landing Hooks in ARAM's Tight Spaces
Thresh hook tips aram focus on prediction rather than reaction. The single lane creates predictable movement patterns—enemies must move forward to poke, backward to safety, or sideways to dodge. Study these patterns during the first few minutes.
The brushes near each tower provide crucial hook angles. Stand inside, wait for enemies to walk past, then hook them from the side. They often won't see the animation start, giving them less reaction time. Coordinate with teammates so they're ready to follow up immediately.
Target priority matters more in ARAM than Summoner's Rift. Hooking the enemy tank accomplishes little unless it creates space for your team. Focus on immobile carries, supports without escape tools, or champions who've used their mobility spells. Watch for enemies who just used dash abilities—they're vulnerable for several seconds.
Predict movement by watching enemy behavior. Players dodging skillshots develop patterns—some always dodge left, others alternate directions. Throw hooks where they'll be, not where they are. If an enemy walks forward aggressively, they're either confident they can dodge or they have backup ready. Adjust your hook timing accordingly.
Use Flay before hook in some situations. If an enemy is close, Flay them toward your team, then immediately hook. The crowd control duration stacks, and they have less time to react. This works particularly well against mobile champions who would otherwise dash away.
Don't throw hooks just because they're available. Each missed hook is a 16-second window where you can't make plays. Sometimes the threat of a hook—forcing enemies to position defensively—provides more value than throwing it and missing.
Author: Megan Crosley;
Source: canelomobile.com
Lantern Mechanics and Team Coordination
The thresh lantern strategy in ARAM revolves around communication and positioning. Your teammates must understand they can click the lantern to dash to you. Use pings liberally—danger ping the lantern when you throw it for saves, or assist ping it when you want someone to follow your engage.
For saves, throw the lantern toward endangered teammates before they expect it. If an ally is running from enemies, place it directly in their escape path so they don't need to change direction. Anticipate where they'll be in one second rather than where they are now.
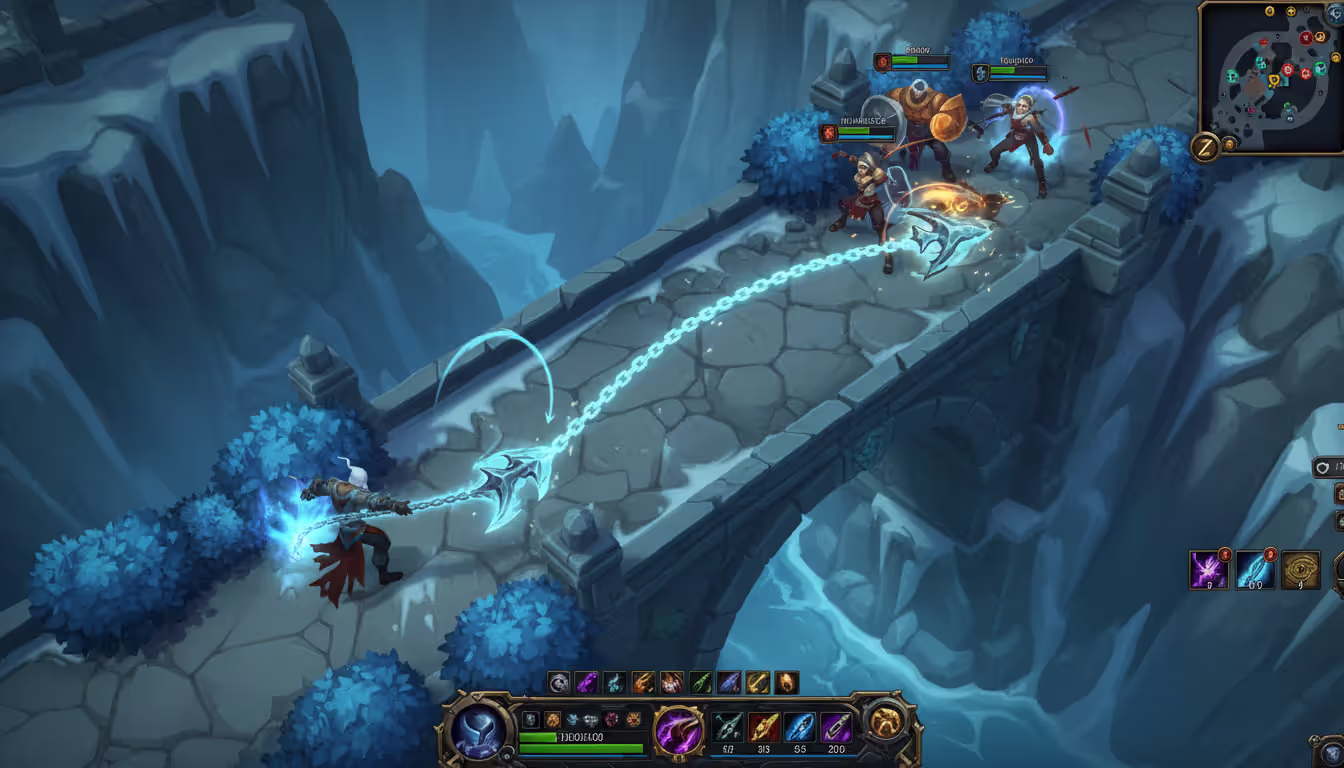
Engaging with lantern requires coordination. Hook an enemy, activate Death Sentence to dash to them, throw lantern back toward your team, then Flay enemies toward your allies. A teammate clicking lantern creates an instant 2v5 scenario that often secures kills. This works best with high-damage champions like ADCs or assassins.
Disengage uses involve throwing the lantern over walls or into your backline. If your team is retreating, position yourself between enemies and allies, then lantern the most valuable teammate to safety. The shield it provides can absorb critical damage.
Common lantern mistakes include placing it behind minions where allies can't click it, throwing it too far from endangered teammates, or using it when no one can capitalize. Watch your teammates' positioning and cooldowns. If your ADC just used their dash, they're more likely to need lantern soon.
Thresh's skill ceiling is deceptive—anyone can throw hooks, but great Thresh players control teamfights through lantern placement and Flay positioning. In ARAM, where fights never end, that difference becomes obvious within minutes
— Michael Archer
Flay and Ultimate Combo Execution
Understanding thresh flay aram combo execution and thresh abilities in aram requires knowing when to engage versus peel. Flay works in two directions—toward you for peel, or perpendicular/away for engage setups.
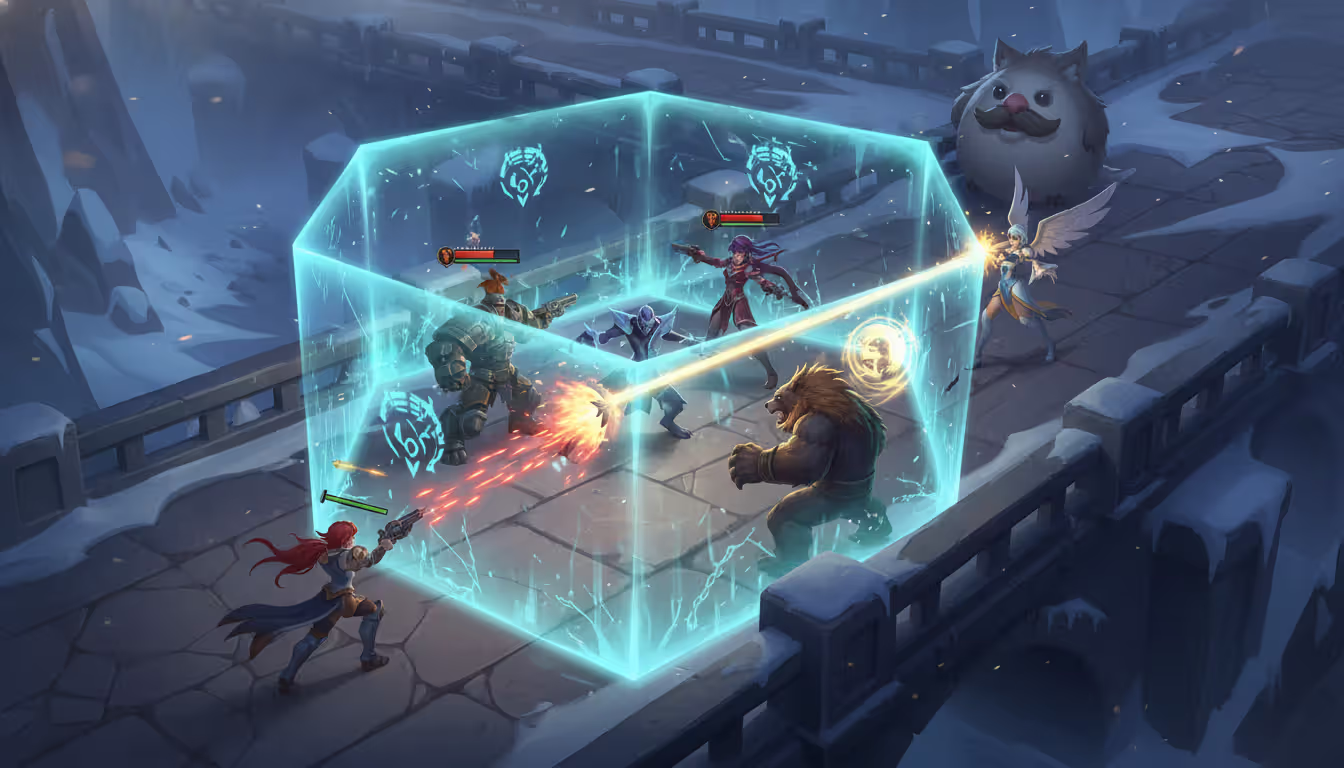
For peel, Flay enemies away from your carries. If an assassin dives your backline, position between them and your ADC, then Flay the threat away. The knockback interrupts their combo and gives your carry time to reposition. Follow immediately with The Box to trap them in walls that slow and damage.
For engage, Flay enemies toward your team after hooking. Hook a target, dash to them with Death Sentence's reactivation, then Flay them deeper into your team's range. This combo prevents their escape and maximizes your team's damage window.
The Box timing determines teamfight outcomes. Cast it immediately after Flay during engages—enemies will break the first wall, getting slowed by 99% for two seconds. This massive slow lets your team collapse. During peel, place The Box around your carries so enemies must break walls to reach them.
Advanced combos include Flash-Flay, where you Flash into range and immediately Flay enemies toward your team. This catches opponents off-guard since they're not expecting the engage range. Follow with hook and ultimate for maximum crowd control duration.
Ability sequencing in extended teamfights means cycling crowd control. After your initial combo, wait for enemies to cluster or commit before using remaining abilities. If you blow everything immediately, you're a low-damage tank for 10+ seconds. Space out your crowd control to control fights longer.
Author: Megan Crosley;
Source: canelomobile.com
Support Playstyle and Teamfight Positioning
The support thresh aram playstyle balances aggression with protection. Your role changes based on team composition and game state. With strong divers, you're an engage tool. With fragile carries, you're a bodyguard.
Soul collection in ARAM requires walking into dangerous positions. Souls drop from dying minions and champions, granting permanent armor and ability power. Early game, collect souls aggressively while enemies respect your hook threat. Late game, souls matter less than staying alive—don't die for two armor.
Vision control is limited in ARAM. You can't place wards, but you can use brushes strategically. Stand in brush to threaten hooks from fog of war. Enemies must face-check or use skillshots blindly, both of which create opportunities.
Positioning depends on your role in each fight. When engaging, position aggressively but leave yourself an escape route—either toward your team or near a brush. When peeling, stand between threats and carries, close enough to Flay but far enough to not get caught yourself.
Frontline positioning works when your team lacks tanks. Stand ahead, absorb skillshots, and hook enemies who overextend. Your passive souls and tank items make you surprisingly durable. Backline positioning works when protecting hypercarries. Stay near them, ready to Flay and lantern at a moment's notice.
Know when not to engage. If your team is low health or lacks cooldowns, throwing a hook and dashing in means dying alone. Sometimes the correct play is waiting, collecting souls, and threatening hooks without committing.
Common Mistakes and How to Avoid Them
Overcommitting after hooks kills more Thresh players than any other mistake. You hook an enemy, dash to them, then realize their entire team is there and yours is too far back. Before reactivating Death Sentence, check your team's position and the enemy's backup. If you can't win the trade, don't take it.
Poor lantern placement wastes your most unique ability. Throwing it randomly or too far from teammates means it provides only a small shield. Be deliberate—every lantern should have a purpose, whether saving someone, engaging with someone, or shielding multiple allies during poke exchanges.
Wasting ultimate happens when you panic-cast The Box without enemies nearby or when a single enemy can easily walk out. The cooldown is long (140 seconds at rank 1), so each use should accomplish something. Ideally, trap multiple enemies or cut off escape routes during kills.
Positioning errors include standing too far forward without hook available, standing too far back when your team needs engage, or standing in predictable spots where enemies can poke freely. Constantly adjust your position based on cooldowns and game state.
Ignoring soul collection early game costs you significant stats. Each soul grants 0.75 armor and ability power permanently. Collecting 100 souls—achievable in most ARAM games—provides 75 armor and ability power, equivalent to multiple item components. Prioritize souls when safe.
Missing easy hooks because you're waiting for "the perfect moment" loses games. Sometimes hooking the enemy tank creates enough chaos for your team to push forward. Don't be so selective that you never use your abilities. Finding the balance between patience and aggression defines good Thresh players.
FAQ
What are the best runes for Thresh in ARAM?
Aftershock as your keystone with Font of Life, Second Wind, and Overgrowth in the Resolve tree provides the best balance of engage power and survivability. Take Hextech Flashtraption and Cosmic Insight from Inspiration as secondary runes for additional playmaking tools and ability haste. This setup works in most games regardless of team composition.
Should I max Q or E first on Thresh in ARAM?
Max E (Flay) first in most ARAM games. The ability has a lower cooldown than Q, deals more consistent damage in constant teamfights, and the passive empowered auto-attacks help with poke. The crowd control duration doesn't increase with ranks, but the damage and shorter cooldown provide more value. Max Q second for the reduced cooldown on hooks.
How do I land more hooks in ARAM teamfights?
Focus on prediction rather than reaction. Watch for enemies who've just used mobility spells, target immobile carries, and throw hooks from brush for reduced reaction time. Don't throw hooks just because they're available—wait for high-percentage opportunities when enemies are distracted or moving predictably. Sometimes the threat of a hook provides more value than throwing and missing.
When should I throw my lantern in ARAM?
Throw your lantern when a teammate is in danger and needs an escape, when you want someone to follow your engage after landing a hook, or to shield multiple allies during poke exchanges. Always ping the lantern so teammates notice it. Place it in your ally's movement path rather than directly on them, since they need a moment to click it.
What items counter Thresh in ARAM?
Quicksilver Sash and Mercurial Scimitar remove your hook and other crowd control effects. Banshee's Veil blocks one hook entirely. Mobility items like Galeforce help carries dodge hooks. Tenacity from Mercury's Treads and Legend: Tenacity reduces your crowd control duration. Teams with multiple cleanse effects or high mobility naturally counter Thresh's playmaking.
Is Thresh good in ARAM compared to other supports?
Thresh ranks among the best ARAM supports because his kit provides engage, disengage, peel, and utility simultaneously. He's flexible enough to work with any team composition and scales well throughout the game. However, he requires mechanical skill and team coordination to maximize effectiveness. Simpler supports like Sona or Soraka might provide more value if you're unfamiliar with Thresh's combos and positioning requirements.
Mastering Thresh in ARAM requires balancing aggression with protection, knowing when to engage versus peel, and communicating with teammates about lantern usage. The constant teamfighting environment rewards players who can land hooks consistently, position correctly for Flay combos, and use The Box to control space during extended brawls.
Your rune setup should prioritize Aftershock for survivability during engages, while your build focuses on tank items with utility components like Locket and Zeke's Convergence. Max E first for reliable damage and peel, save your hooks for high-percentage opportunities, and place lanterns deliberately rather than randomly.
The difference between average and excellent Thresh players shows most clearly in lantern usage and Flay direction. Practice throwing lanterns into your teammates' escape paths, using Flay to peel threats off carries, and timing The Box to trap multiple enemies. Avoid overcommitting after hooks, collect souls when safe, and adjust your positioning based on whether your team needs engage or protection.
With practice, Thresh becomes one of the most impactful ARAM champions, capable of turning teamfights through crowd control chains and playmaking potential. Focus on consistent execution rather than flashy plays, and your win rate will improve steadily.
Vault 22 stands as one of the most atmospheric and challenging locations in Fallout: New Vegas. This comprehensive guide covers all five vault levels, enemy combat strategies, key item locations, and the moral choices in There Stands the Grass quest
Planning your primogem budget in Genshin Impact requires more than luck—it demands strategy, patience, and accurate information about which characters are coming and when. With HoYoverse maintaining a steady release schedule through 2026, knowing the banner rotation helps you avoid regret
The Open Hand Temple murder mystery in Baldur's Gate 3 requires careful investigation to identify the real killer. Learn how to find all clues, interrogate suspects correctly, and follow the trail to Ilessan Hills for the complete solution and best rewards
Mel brings unique AP damage, CC, and defensive utility to ARAM. This comprehensive guide covers her abilities, optimal builds, runes, positioning strategies, and counters to help you dominate Howling Abyss with smart itemization and ability timing
The content on this website is provided for general informational and educational purposes only. It is intended to explain concepts related to video games, gaming guides, builds, mobile gaming, multiplayer strategies, and gaming history.
All information on this website, including articles, guides, and examples, is presented for general educational and entertainment purposes. Gameplay outcomes, strategies, and performance may vary depending on player skill, game updates, and platform.
This website does not provide professional advice or guarantee game outcomes, and the information presented should not be used as a substitute for official game documentation or developer guidance.
The website and its authors are not responsible for any errors or omissions, or for any outcomes resulting from decisions made based on the information provided on this website.