Most players see Sona and think "wow, that's easy mode." Three abilities, click buttons near teammates, press R to stun. Done.
Then they actually play her. First death at 4 minutes to a Blitzcrank hook. Second death running completely out of mana after six Q casts. Third death whiffing ultimate on just the enemy Cho'Gath while their Jinx kills your entire team.
Sona punishes bad habits harder than almost any support. Stand 50 units too far forward? You're dead before Flash comes off cooldown. Spam abilities mindlessly? Congrats, you're recalling while your ADC dies 2v1. Hold your ultimate waiting for that perfect moment? You'll die with it unused, watching your team spam question-mark pings.
What actually makes her strong: the transition from lane bully to healing machine to late-game stat multiplier. Levels 1-5, you're poking constantly with Q. Levels 6-11, you're keeping people alive through skirmishes. Levels 12+, your auras are pumping teammates full of so many free stats that fights become 5v5s where your team just... wins.
After about 300 Sona games between Season 12 and now, I've learned that "simple" champions expose your mistakes faster than complex ones. This guide reflects Season 14's current patch cycle—the rune setups that work right now, the item builds that matter in real matches, the positioning habits that keep you from getting one-shot.
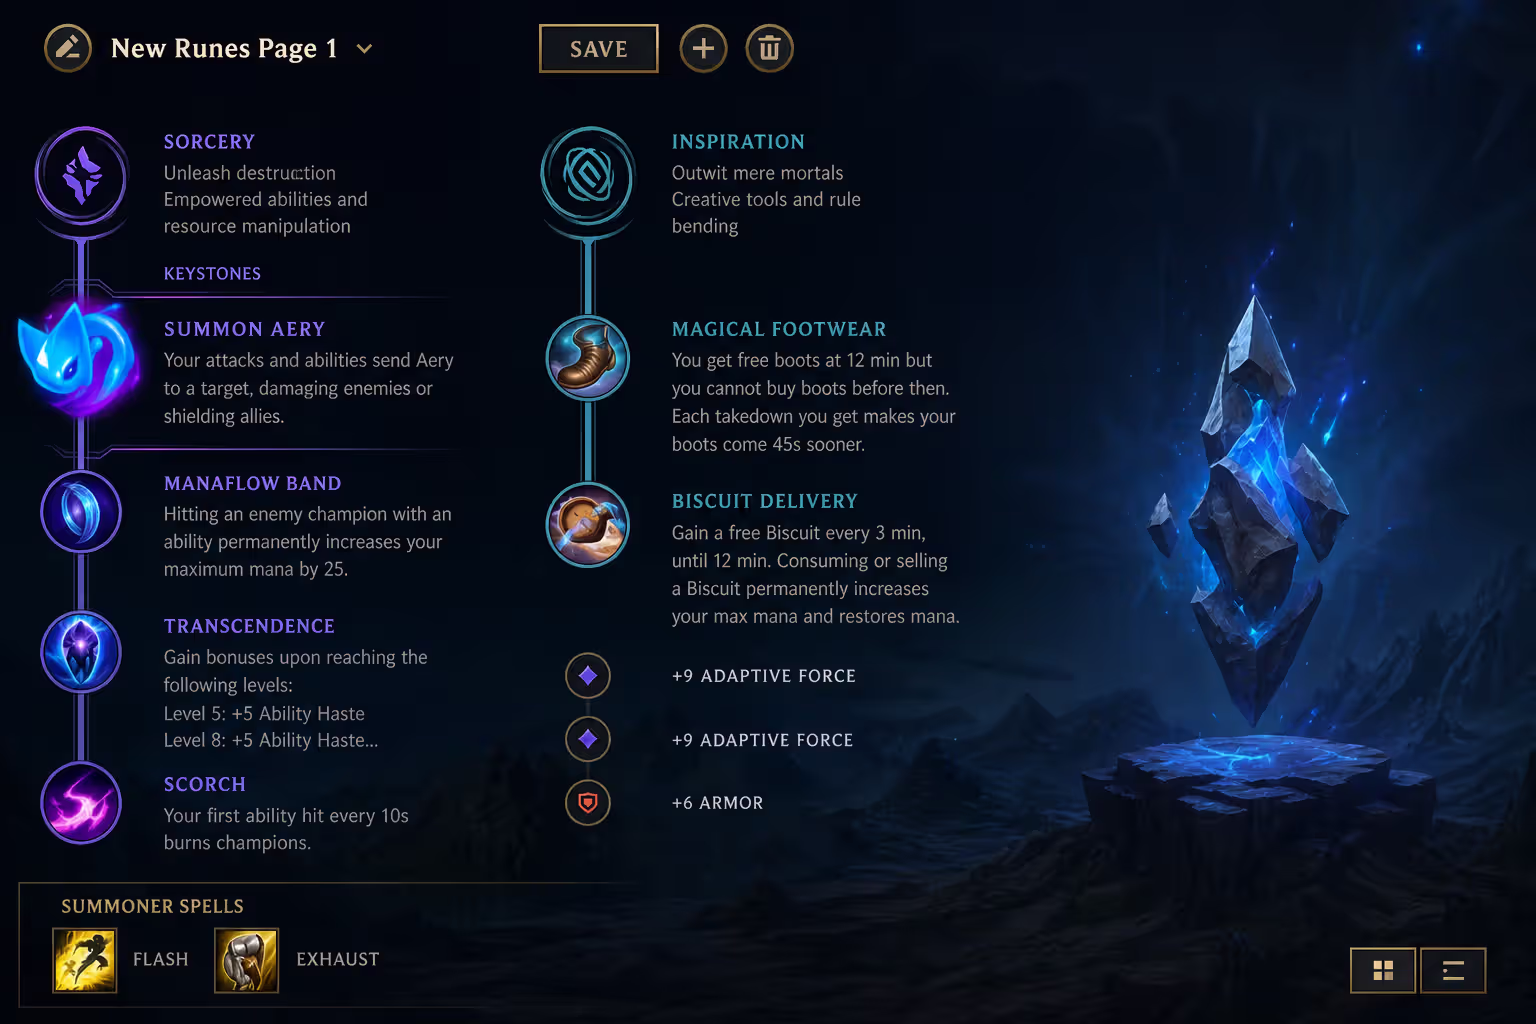
Best Runes and Summoner Spells for Sona Support
Your sona runes support setup solves two specific problems: not running out of mana before hitting level 6, and scaling hard enough that you're not just playing a worse Lulu.
Summon Aery. No debate needed. It procs on absolutely everything. Q an enemy? Damage buff. W your ADC? Shield applied. You're getting value literally every 3 seconds in lane, stacking up thousands of extra damage and shielding across a 25-minute game.
Primary Path (Sorcery): - Summon Aery: Works on both damage and shields, doubling down on whatever you're doing that second - Manaflow Band: Non-negotiable. Stack this to 250 bonus mana before level 6 or you'll be backing every 90 seconds - Transcendence: Level 8 breakpoint gives you ability haste immediately, cycling abilities faster for more power chord procs - Scorch or Gathering Storm: Scorch when you're closing by 28 minutes, Gathering Storm when you know it's going 35+ minutes based on team comps
Secondary Path (Inspiration): - Biscuit Delivery: The mana matters more than the health. Pop these at 30% mana, not when you're full health but low mana - Cosmic Insight: Flash cooldown reduction equals more Flash-Crescendo plays, plus your mythic active comes back faster
Stat Shards: Two Adaptive Force shards always (boosts Q damage and W healing simultaneously), then Armor versus physical bot lanes or Magic Resist when facing Lux, Zyra, Brand.
Some players run Guardian into Leona or Nautilus lanes. Does it work? Sure, if you want training wheels. But learning proper positioning with Aery beats building defensively and still getting caught. Guardian won't save you when you're standing in hook range.
Summoner Spells: Flash and Exhaust, every single game. Flash enables your engage ultimate and emergency escapes. Exhaust completely neuters enemy ADC all-ins. Some Sonas take Ignite into passive lanes—Ezreal/Yuumi type stuff—but you're sacrificing all defensive options for marginally more kill pressure. Not worth it.
Author: Jordan Kessler;
Source: canelomobile.com
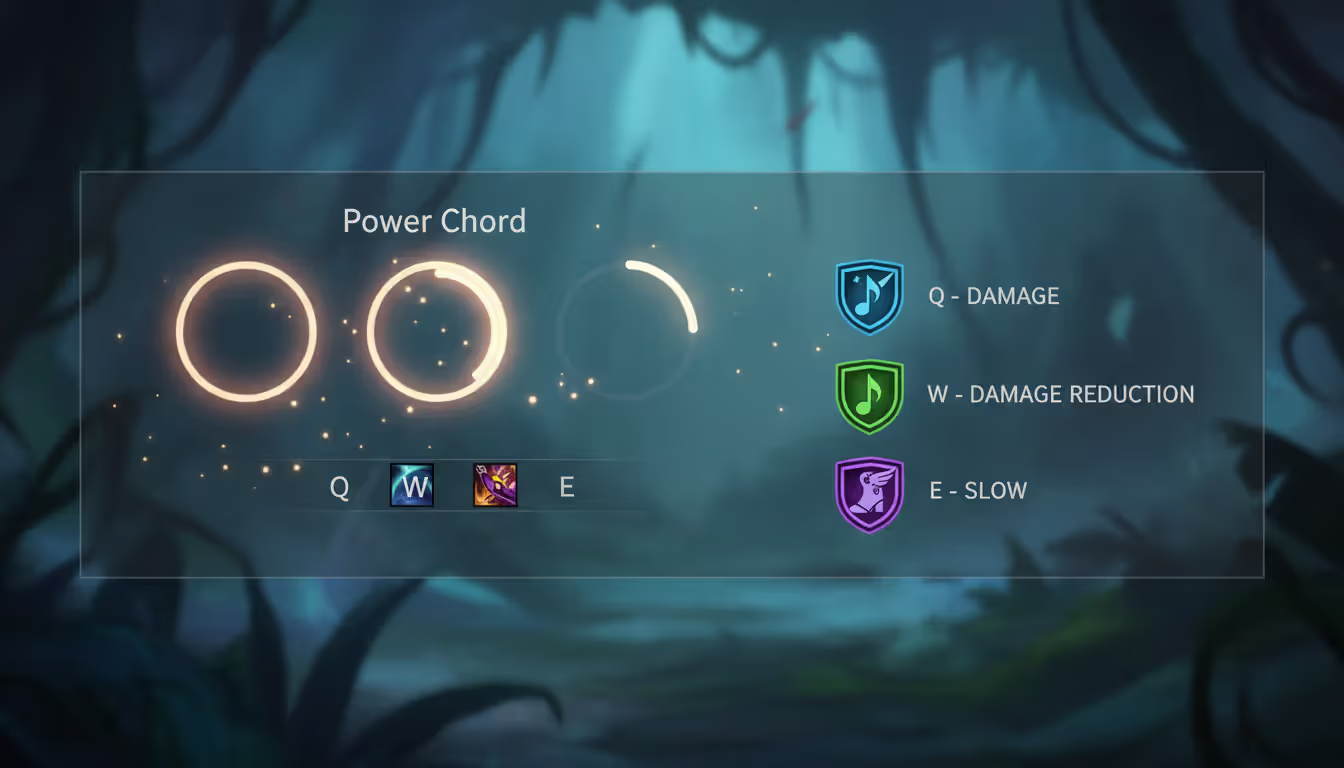
Sona Ability Sequence and Skill Priority
The sona ability sequence always starts Q level 1. You need the poke damage and range advantage to generate Spellthief's gold. W comes second at level 2 for emergency healing when enemy supports engage. E at level 3 completes your basic kit.
Standard Max Order: R > Q > W > E
Q max delivers three benefits: higher damage per cast, reduced cooldown for faster power chord generation, and better trading windows. Every rank pumps damage and lowers cooldown, transforming you from "minor annoyance" into "legitimate lane threat."
W maxing comes second because teamfights start happening around 11-13 minutes, and you need substantial heals to keep people alive. E sits at rank 1 until levels 13-18 since the movement speed increase per rank is pathetic—maybe 5-10 MS total. The utility comes from having the speed boost available, not maximizing its value.
When to Deviate:
Sometimes I'll grab three Q points, then immediately swap to maxing W when laning phase obviously ends around 12 minutes. Works when you're ahead and want sustained pressure, but delays your healing breakpoint by two minutes.
Power Chord Mechanics: Every third ability generates empowered auto-attack. In lane, cast Q twice, then auto the enemy ADC with your empowered Q chord for 40% bonus magic damage—this is your bread-and-butter harass combo. W power chords cut enemy damage output 20% for 3 seconds, perfect when their ADC commits to all-ins. E power chords slow 40%, securing kills or escaping ganks.
Most Sonas waste power chords by ignoring their passive stacks. Watch that indicator above your abilities. Two stacks showing? Get ready to auto something meaningful, not the random cannon minion.
Author: Jordan Kessler;
Source: canelomobile.com
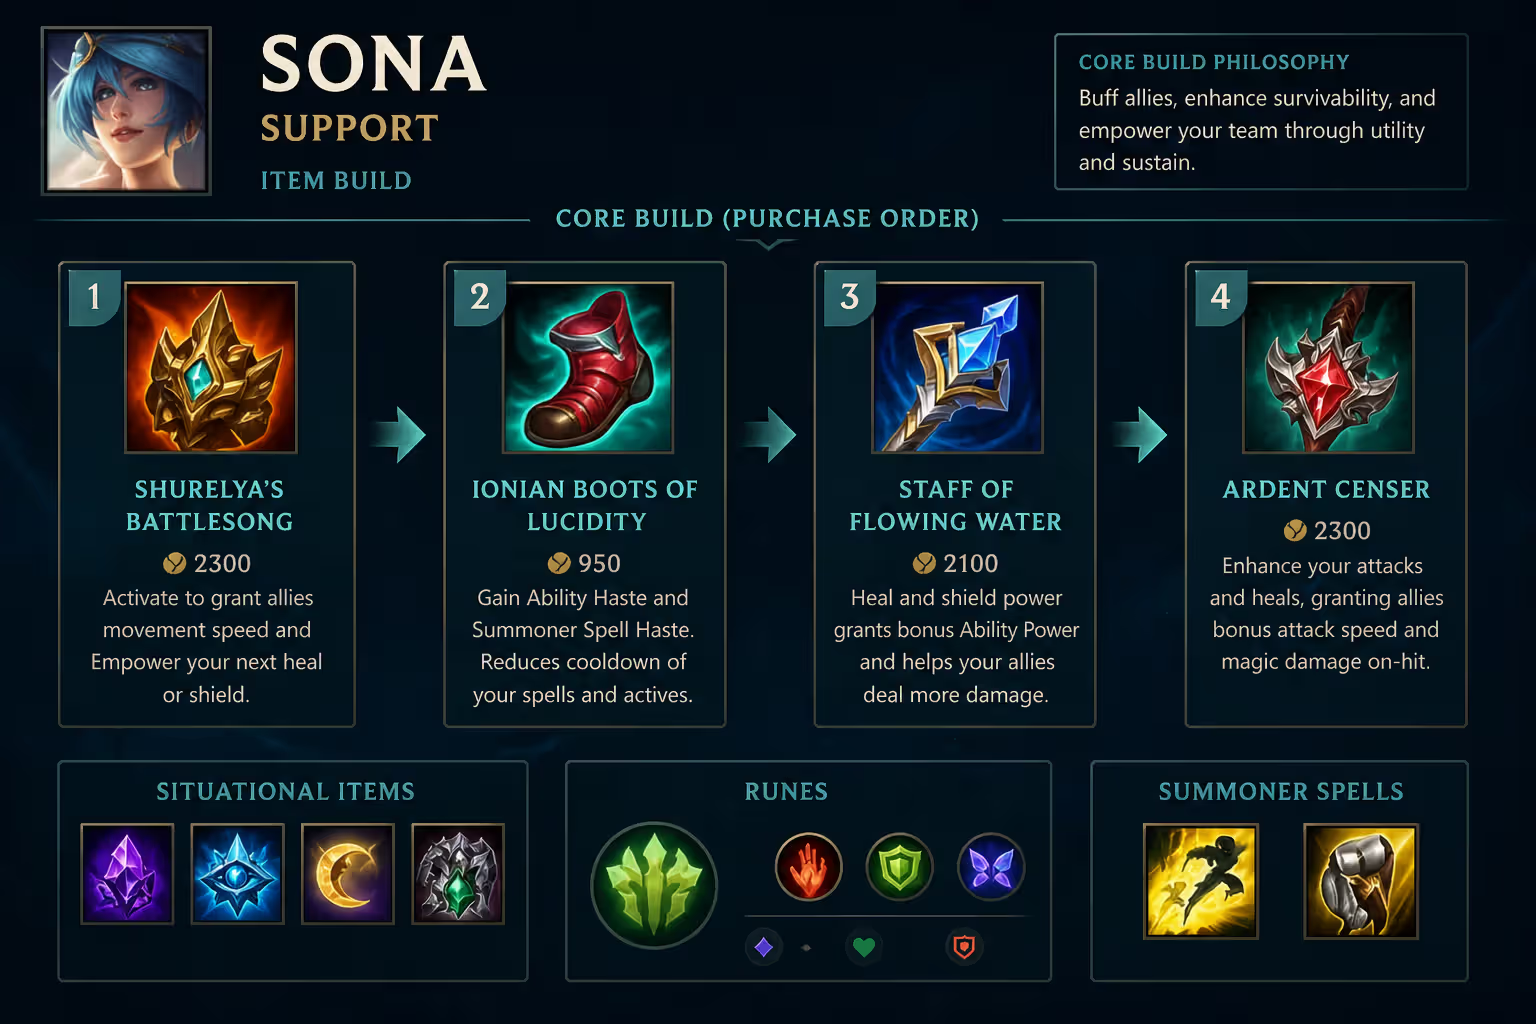
Core Items and Aura Effects Explained
Here's where sona aura items explained matters. Players build items without understanding kit interactions, which is like buying ingredients without knowing the recipe.
Understanding Sona's Aura Synergies
Each basic ability creates a 3-second aura around you: - Q Aura: Nearby allies get bonus magic damage on next auto (20-60 based on rank) - W Aura: Nearby allies receive small shield (25-90 plus AP scaling) - E Aura: Movement speed boost for repositioning (10-14% plus AP scaling)
Critical part: items amplifying shields and healing multiply your W effectiveness. Moonstone Renewer adds healing-over-time stacking with your W spam. Staff of Flowing Water gives allies AP and movement speed whenever you shield or heal—your W becomes a combat buff.
Seraph's Embrace needs special mention. Sona stacks Tear faster than virtually anyone since Q, W, E all count as unique casts. By 18-20 minutes you fully stack it, gaining massive mana pool, AP conversion, and shield active that saves you from assassins. The 860 mana converts to roughly 24 ability power once transformed.
Best Item Build Path by Game Phase
Starting Items: Spellthief's Edge with two Health Potions. Gold generation from poking synergizes perfectly with Q spam. Don't buy Relic Shield—you can't proc it reliably and you're too squishy for melee range.
First Back (400-900 gold): Amplifying Tome plus Control Ward, or rush Bandleglass Mirror if you somehow hit 1300 gold. Boots can wait unless you're facing Blitzcrank or heavy skillshot champions where dodging matters more than stats.
Mythic Choice: Shurelya's Battlesong versus Moonstone Renewer. Shurelya's gives playmaking through active speed boost—great for starting fights with Crescendo or escaping bad situations. Moonstone excels in prolonged poke wars where you're constantly casting on allies. Pick Shurelya's when your team lacks engage. Go Moonstone when you already have frontline initiators like Malphite or Leona.
Core Build Order: 1. Mythic item (chosen based on team comp) 2. Boots of Lucidity—desperately needed ability haste to cycle abilities faster 3. Staff of Flowing Water for mana sustain, AP, and ally movement speed proc 4. Ardent Censer if your ADC is Jinx, Kog'Maw, Vayne (basically anyone loving attack speed), otherwise Chemtech Putrifier versus heavy healing comps
Situational Adjustments: - Mikael's Blessing: Against Ashe, Morgana, or any comp with point-and-click CC threatening your carries - Redemption: When teamfights consistently happen around objectives where enemies cluster in dragon/baron pits - Seraph's Embrace: Games going late with 2600 gold to invest transforms you into AP monster with serious survivability
Super Late Game: Rabadon's Deathcap if you're swimming in gold past 35 minutes. The 35% AP multiplier transforms your 300 AP into 405 AP, pumping heals to 350+ HP and making Q poke actually threatening.
Whatever you do, avoid tank items. Frozen Heart, Zeke's Convergence—these are traps. Sona scales with AP and ability haste, not resistances. You survive through proper positioning, not defensive stats.
Author: Jordan Kessler;
Source: canelomobile.com
Playing Sona in Poke and Sustain Lanes
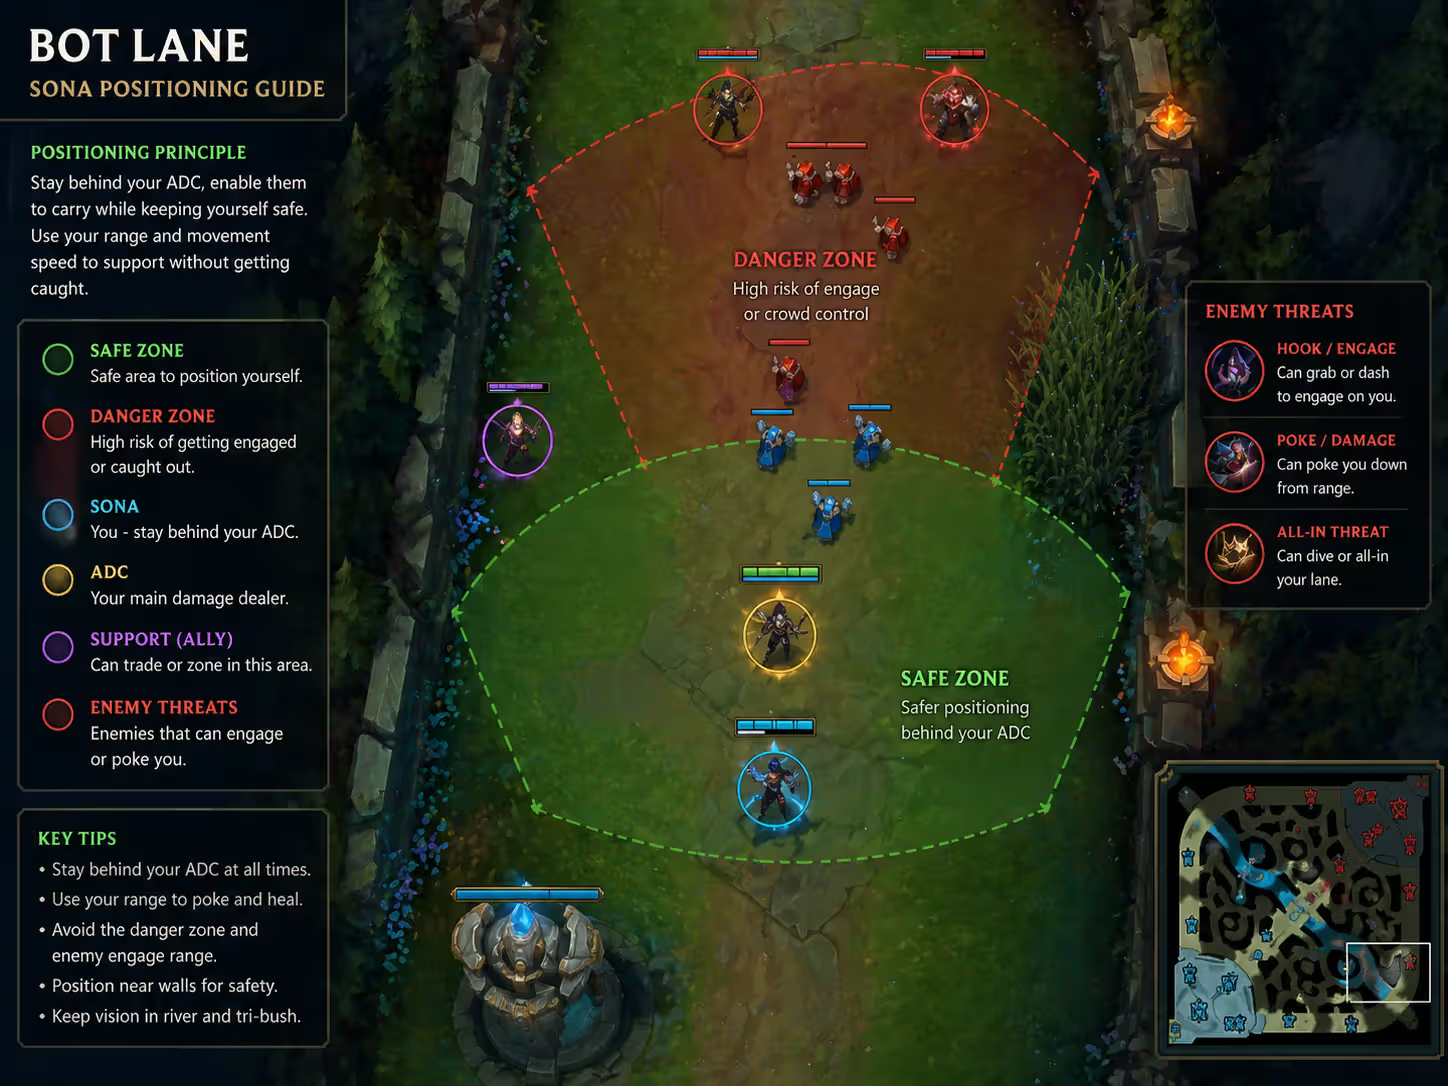
Sona poke lane strategy exploits your 550-range Q while maintaining safe positioning. Stand slightly behind your ADC, not beside them. When enemy ADC steps up for CS, press Q and immediately auto-attack. Your Q automatically targets two nearest enemies—no aiming required.
Mana Management Reality: Early levels hurt. Each Q costs 50-75 mana depending on rank. You start with roughly 340 base mana and 11.5 mana regen per 5 seconds. Quick math—you cast maybe 6-7 abilities before going completely OOM at levels 1-3.
Only use Q when: - Enemy ADC is isolated from support (easier to punish) - Manaflow Band proc is available (every 60 seconds early) - You won't get collapsed on by their jungler or support
W costs 80-105 mana early and heals a measly 30-50 HP at rank 1. Don't spam it. Save for when your ADC actually needs healing—after taking Caitlyn headshot, or when they're low enough that one more trade kills them.
Positioning Fundamentals: Sona starts with 480 base HP at level 1. You're literally one of the squishiest champions in the game. Maintain 550+ range from enemy engage supports constantly. Against Thresh, hide behind minions. Against Blitzcrank, position diagonal to your ADC so his hook can only threaten one of you. Against Leona, respect her 875-unit E range and save Flash for her ultimate.
The Sona Healing Guide Philosophy:
Healing becomes impactful after level 6 and your first item component. W at rank 3-4 heals 90-120 HP plus 25% AP ratio. With just Bandleglass Mirror (20 AP), you're healing 95-125 HP per cast. Cast it 3-4 times during a 10-second skirmish and you've provided 300-400 effective HP.
Timing beats frequency. Heal immediately after enemy burst combos land—right after Lucian finishes passive double-shot, or when Tristana's E bomb explodes. Don't spam W on cooldown or you'll run OOM with nothing when it matters.
Sustain lanes against poke champions (Caitlyn, Ezreal, Xerath) become resource wars. They're forcing you OOM. You're healing efficiently while generating Spellthief's gold through Q poke. Struggling hard with mana? Buy early Tear even though it delays your mythic—400 gold now saves three extra recalls.
Author: Jordan Kessler;
Source: canelomobile.com
Crescendo Ultimate Tips and Teamfight Positioning
Crescendo is a 1000-range skillshot stunning everyone it touches for 1.5 seconds. Sounds straightforward. In practice, sona crescendo tips separate decent Sonas from game-winning Sonas.
Flash-Crescendo Combo: The classic engage. Flash into 3+ enemies and immediately press R. Cast time is so fast enemies get maybe 0.2 seconds to react. Use this when: - Your team is grouped and ready to follow up (check before you run it down) - Enemy carries burned Flash recently or are clumped together - You're ahead enough that trading your life for 3+ enemy deaths wins the game
Defensive Crescendo Usage: More common as you climb. Hold ultimate to peel for carries against divers and assassins. When Zed ults your ADC, position between them and Crescendo him the instant he exits Death Mark. When Hecarim charges backline, ult him mid-animation to cancel his engage.
Multi-Target Setups: Crescendo's width is 150 units (roughly two champion models side-by-side). Enemies grouped for objectives are perfect targets. Stunning their ADC and support simultaneously beats stunning only their fed mid laner. Think area of effect, not single target deletion.
Crescendo Mistakes I See Daily: - Ulting only the tank who walked up—complete waste - Using it to secure a kill that's already 100% dead—now you have no ult for next fight - Holding it so long you die without casting—better to use it "early" than never
Teamfight Positioning Logic: Stand 600-800 units behind your frontline. Close enough that W and E auras reach your carries. Far enough that enemy assassins can't instantly reach you. Watch for flanks constantly—Zed, Talon, Ekko will try reaching you through side angles.
Spam abilities on cooldown during fights. Q for damage and ally damage buffs. W for healing and shields. E for repositioning and kiting. Your power chords should rotate between Q power chord (damage) on enemy carries and W power chord (damage reduction) on whoever's diving your team.
Sona's teamfight impact is deceptive—you're not making flashy plays, but if you stay alive and cycle your auras for 10 seconds, you've essentially given your team a 5,000 gold advantage in stats
— Bizzleberry, Challenger Support Main
Sona's Best Duo Partners and Lane Synergies
Sona best duo partners depends on whether you want dominating lane or scaling into late game. She works with most ADCs, but certain pairings create synergy that feels unfair.
ADC Champion
Synergy Rating
Lane Phase Strength
Scaling Potential
Playstyle Notes
Ezreal
9/10
Strong
Excellent
Both want Tear and scale with mana; double poke makes lane miserable for enemies; extremely safe blind pick
Jinx
8/10
Medium
Excellent
Weak early but dominates teamfights at 3 items; rush Ardent Censer; play safe until 15 minutes
Kog'Maw
8/10
Weak
Excellent
Hyper-scaling comp; needs jungle babysitting early; becomes unstoppable raid boss with your buffs
Lucian
7/10
Strong
Medium
Aggressive Q poke synergy makes lane dominant; falls off hard if not ahead by 20 minutes
Jhin
7/10
Medium
Good
Poke synergy works well; your E slow into his W root creates picks; lacks sustained DPS in fights
Draven
6/10
Strong
Medium
Massive early kill pressure if played aggressive; risky because falling behind ruins Draven's scaling
Why Ezreal Works Best: Both champions want Tear of the Goddess. Both scale with ability haste. Both prefer poke trading over all-ins. Your Q poke combined with his Q creates constant pressure. Your E movement speed helps him kite perfectly. Your W shield plus his E blink makes him nearly unkillable in teamfights.
Why Jinx Works Late: Ardent Censer plus Sona Q aura turns Jinx into a building-demolishing machine. Your E movement speed helps her reposition between rocket attacks. Your ultimate sets up perfect Rocket AoE damage. The tradeoff? Absolutely terrible laning phase where you're praying for 15 minutes without dying.
Avoid These Pairings: Yasuo bot, Seraphine ADC, or other experimental picks that don't provide consistent DPS. Sona needs a partner capitalizing on her buffs and healing, not another enchanter or weird flex pick.
Common Mistakes and How to Avoid Them
Overextending for Poke: New Sona players walk way too far forward trying to land Q harass, then get hooked or all-inned. Simple rule: never stand closer to enemies than your ADC stands unless you're deliberately baiting a skillshot you know is on cooldown.
Terrible Mana Usage: Spamming all three abilities on cooldown drains your entire mana bar in under 30 seconds. Priority order: Q for poke and gold generation, W only when healing is actually needed, E only for repositioning during fights or chasing guaranteed kills—never just to walk back to lane faster.
Mistimed Ultimates: Holding Crescendo for the perfect five-man stun that never materializes. Reality check: a two-man stun on their ADC and support at 25 minutes wins the teamfight. Stop being greedy waiting for montage plays.
Warding Without Vision: Sona's low mobility makes face-checking brushes basically suicide. Always ward from safe positions. Use your E movement speed to quickly place deep wards then immediately retreat. Swap to Oracle Lens after completing your support quest—let teammates place wards while you deny enemy vision.
Forgetting Power Chord Exists: Auto-attacking between abilities is mandatory, not optional. Each empowered auto adds 100-200 damage in trades. Players who only cast abilities and never weave in autos lose 30-40% of their total damage output.
Autopilot Mythic Building: Building the same mythic every single game regardless of team comps. You need to decide at 8-10 minutes: Shurelya's into immobile teams, Moonstone into prolonged teamfights. Check both team compositions and adapt.
Frequently Asked Questions About Sona Support
What runes are best for Sona support in the current meta?
Summon Aery with Sorcery primary (Manaflow Band, Transcendence, Scorch or Gathering Storm) paired with Inspiration secondary (Biscuit Delivery and Cosmic Insight). This combination solves mana problems while providing both lane pressure and scaling. Guardian works against heavy engage like Leona or Nautilus, but you sacrifice early game impact and honestly should just learn better positioning instead.
Should I max Q or W first on Sona?
Max Q first in virtually every game (95%+). The damage increase, cooldown reduction, and power chord frequency make you an actual lane threat instead of a passive heal-bot. W gets maxed second for teamfight healing. E stays rank 1 until levels 13-18 since the movement speed barely scales with ranks. Only max W first if you're playing ultra-defensive scaling, which wastes Sona's strong early-mid game.
How do Sona's aura items work with her passive?
Each basic ability (Q/W/E) grants a 3-second aura to nearby allies. Items like Staff of Flowing Water trigger when you shield or heal allies with W, giving them bonus AP and movement speed. Ardent Censer grants attack speed and on-hit damage when you shield or heal. These effects stack multiplicatively with your natural aura buffs, creating compound value when timed correctly during fights.
Which ADCs synergize best with Sona?
Ezreal provides the strongest all-around synergy because both champions want Tear, scale with mana/ability haste, and excel at poke trading. Jinx and Kog'Maw deliver the highest late-game carry potential when you build Ardent Censer. Lucian and Draven work for aggressive lane-dominant strategies. Avoid immobile ADCs without self-peel like Ashe or Miss Fortune when facing heavy engage compositions.
When should I use Crescendo aggressively vs. defensively?
Use it aggressively when Flash is available, your team is grouped and paying attention, and enemy carries are clumped without escape tools ready. Use defensively when assassins or divers threaten your backline, when you're behind in gold, or when one bad teamfight loses the game. In even games, default to defensive usage—keeping your fed ADC alive matters more than making montage plays that might backfire.
Is Sona viable in high elo ranked play?
Yes, with caveats. Sona maintains 51-52% win rate in Diamond+ during Season 14, and she's definitely playable in Master+ when piloted by one-tricks who understand her limits. Her main weakness is vulnerability to coordinated early dives and jungle pressure. She thrives in solo queue where teams struggle to close games before 25 minutes. Don't blind pick her into Blitzcrank, Nautilus, or Pyke—you'll have a miserable time.
Sona rewards patience and smart decision-making over mechanical skill. You're not going to outplay people with flashy combos. Instead, you win by surviving lane without falling behind, hitting your item timings consistently, and positioning perfectly in teamfights.
The gap between average Sona players (48% win rate) and dedicated Sona mains (54%+ win rate) isn't mechanics—it's understanding when to trade, when to conserve mana, when to Flash-ult, and which items counter specific team compositions. Treat each game as a scaling mission: survive early without inting, accelerate through mid game, dominate late game teamfights.
Every game on Sona teaches you something about resource management, positioning, or fight timing. Take those lessons seriously and you'll climb steadily, even if you're not making highlight-reel plays every game.
Xilonen is one of Genshin Impact's most versatile Geo supports. This comprehensive guide covers optimal artifact sets, weapon choices, talent priorities, team compositions, and whether to build her as support or DPS, with detailed constellation breakdowns and expert tips
Master Windwalker Monk with this comprehensive BiS guide. Learn optimal stat priorities (Versatility > Crit > Mastery), acquire best-in-slot gear for each slot, understand tier set bonuses, execute the proper rotation, and configure essential WeakAuras for maximum DPS
Tingyun remains one of the most accessible and versatile support characters in Honkai: Star Rail. This guide covers her best light cones, optimal relic builds, team compositions, eidolon value, and advanced tips to maximize her ATK buffs and energy generation across all content
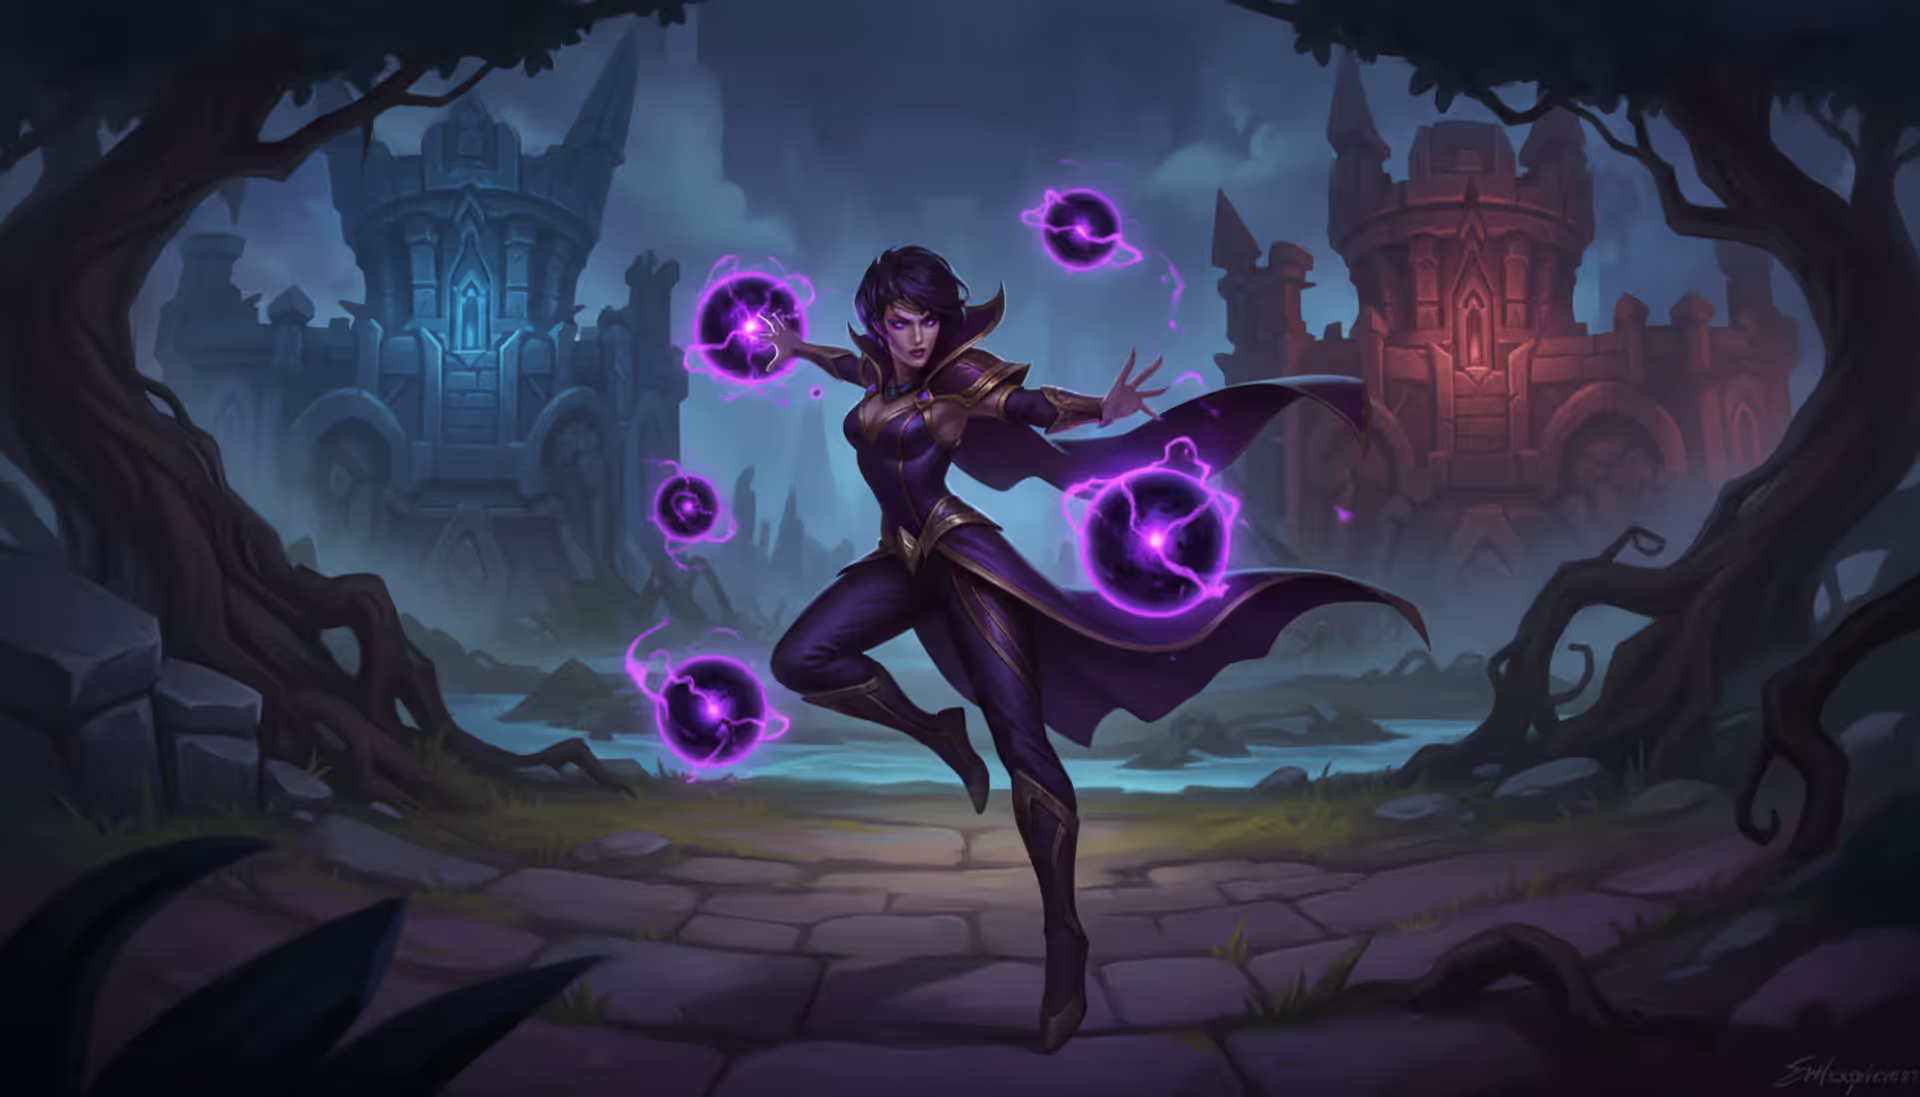
Syndra remains one of the most rewarding mages for players who master sphere manipulation. This comprehensive guide covers optimal rune configurations, core AP builds, essential combos, and matchup strategies that separate good Syndra players from great ones in 2026
The content on this website is provided for general informational and educational purposes only. It is intended to explain concepts related to video games, gaming guides, builds, mobile gaming, multiplayer strategies, and gaming history.
All information on this website, including articles, guides, and examples, is presented for general educational and entertainment purposes. Gameplay outcomes, strategies, and performance may vary depending on player skill, game updates, and platform.
This website does not provide professional advice or guarantee game outcomes, and the information presented should not be used as a substitute for official game documentation or developer guidance.
The website and its authors are not responsible for any errors or omissions, or for any outcomes resulting from decisions made based on the information provided on this website.